Creating a Paper Plate Santa Claus craft is a fantastic holiday activity that combines fun, creativity, and the festive spirit of Christmas. It’s an engaging project for children and adults alike, offering a hands-on way to decorate for the season. With simple household materials and a touch of imagination, you can transform a plain paper plate into a charming representation of jolly old Saint Nick.
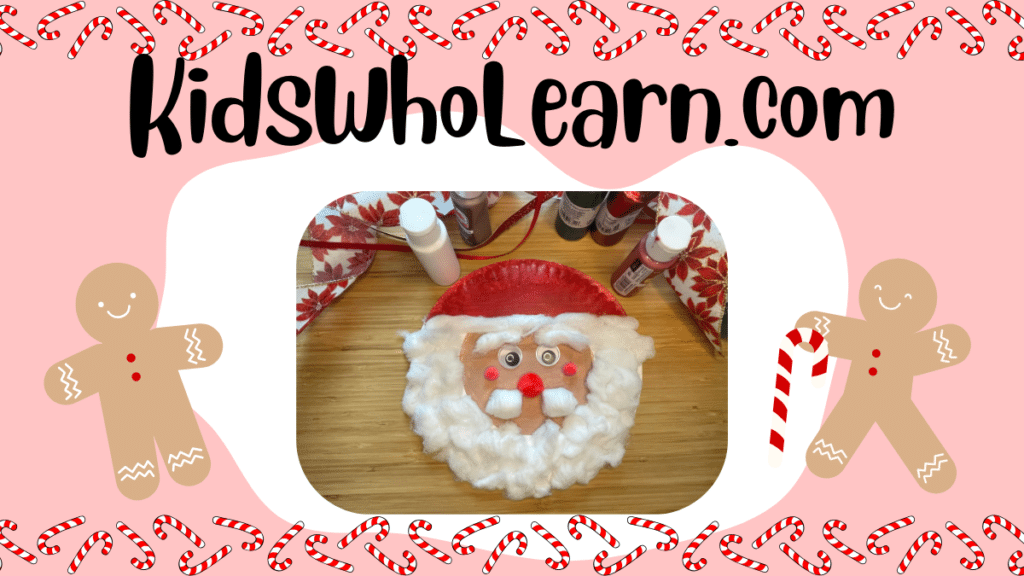
The foundation of this craft relies on everyday items found easily at home or at any craft store, ensuring that the joy of making a Paper Plate Santa Claus is accessible to all. As you follow the step-by-step instructions, you’ll learn how to assemble and decorate your Santa with materials like construction paper, cotton balls, and markers. Along the way, this activity not only sparks creativity but also serves as a wonderful opportunity for skill development and family bonding. Once completed, your Paper Plate Santa Claus will be ready to add a personal touch to your holiday decor or serve as a thoughtful handmade gift.
Key Takeaways
- A Paper Plate Santa Claus craft is a delightful and accessible project for the holiday season.
- Basic materials and sequential instructions facilitate the creation of this charming Santa decoration.
- This craft activity promotes creativity, skill development, and can contribute to festive holiday decor.
Essential Materials for Paper Plate Santa Claus Craft

To create your own Paper Plate Santa Claus, gather the following materials to ensure a smooth crafting experience:
Base Materials:
- Paper Plate: The foundation of your craft, providing the canvas for Santa’s face.
- Construction Paper: Red, white, and black sheets for Santa’s hat, eyes, and mouth.
Decorative Elements:
- Cotton Balls: To mimic the fluffy texture of Santa’s beard and the brim of his hat.
- Red Pom Pom: This will become the nose, giving Santa a cheerful pop of color.
- Googly Eyes: To bring your Santa to life with a merry twinkle.
Adhesives:
- Glue: Standard PVA glue works well for securing the cotton balls and paper elements.
- Tape: Useful for reinforcing parts if needed.
Tools:
- Scissors: For cutting construction paper into the desired shapes.
- Paint: Red and white paints to add color to Santa’s hat and face.
- Paintbrush: To evenly apply paint to the paper plate.
Organize these materials before starting your craft. Each plays a crucial part in creating a festive Santa Claus. With these items at hand, you’re ready to begin crafting your holiday decoration.
Step-by-Step Guide to Creating Your Paper Plate Santa
Creating your paper plate Santa Claus craft is an easy and fun project. Follow these specific directions to assemble a charming Santa with a jolly face and festive hat using simple materials.

Preparing the Paper Plate
First, take a plain paper plate which will form the base of your Santa Claus craft. Ideally, choose a sturdy paper plate to support the additional materials you’ll add. If the paper plate has a glossy finish, lightly sand it with fine-grain sandpaper to help the glue and paint adhere better.
Crafting Santa’s Face
For Santa’s face, you’ll need pink or flesh-toned paint, a brush, and some cotton balls.
- Painting: Paint the center of the paper plate with the pink or flesh-toned paint to create the face. Allow the paint to dry completely.
- Eyes: Glue two googly eyes onto the painted area for Santa’s twinkling eyes, or draw them on with a marker.
- Nose: Use a small pompom or a piece of red construction paper cut into a circle for the nose. Glue it in place.
- Beard: Glue cotton balls around the face for Santa’s fluffy beard, leaving room for the hat brim.
Painting Santa’s Hat
Put together Santa’s hat using red paint.
- Hat Shape: Paint the top 20% of the paper plate red for Santa’s hat.
- Brim and Pom-Pom: Glue cotton balls along the bottom edge of the triangle to form the brim of the hat.
Remember to press down firmly on the pieces as you glue them to ensure they stick to the plate. Your paper plate Santa Claus is now ready to bring holiday cheer to any room or event.
Alternative: Assembling Santa’s Hat With Construction Paper
Put together Santa’s hat using red construction paper, cotton, and glue.
- Hat Shape: Cut out a triangle from the red construction paper to fit the top part of the plate as Santa’s hat.
- Gluing: Glue the triangle to the top of the paper plate, aligning the bottom edge of the triangle with the top edge of Santa’s face.
- Brim and Pom-Pom: Glue cotton balls along the bottom edge of the triangle to form the brim of the hat. Attach a single cotton ball at the point of the triangle for the pom-pom.
Remember to press down firmly on the pieces as you glue them to ensure they stick to the plate. Your paper plate Santa Claus is now ready to bring holiday cheer to any room or event.
Decorative Details for a Festive Finish

Crafting a Paper Plate Santa Claus is all about the festive details. Pay special attention to the beard, hair, hat, eyes, and nose to bring your Santa to life.
Adding Santa’s Beard and Hair
To create Santa’s beard, use white paper cut into strips or individual pieces to mimic the texture of a fluffy beard. Attach these to the lower half of the plate. For the hair, cut more white paper into appropriate lengths and glue them around the top edge of the plate, just below where the hat will sit.
Creating the Iconic Red Hat
Fashion Santa’s hat out of a piece of paper cut into a triangle shape. Color it red or use red construction paper for authenticity. Don’t forget to add a white strip at the base to represent the fur trim and a red pom pom at the tip for that classic Christmas touch.
Final Touches: Eyes and Nose
Lastly, add the eyes and nose to give Santa his jolly expression. For the eyes, use googly eyes or draw them with markers, ensuring the look is friendly and cute. Complete the face with a red nose—you can use a small red pom-pom or a circle of red paper. For an extra detail, add pink cheeks just beneath the eyes to create a warm, rosy glow that complements the skin tone paper used for Santa’s face.
Craft Activities to Enhance Learning

Incorporating Santa craft activities into your learning curriculum can significantly aid in the development of children’s fine motor skills and provide a fun way to engage with educational concepts.
Developing Fine Motor Skills with Santa Crafts
Fine motor skills are crucial in a child’s development, and crafting a Santa Claus from a paper plate is a delightful way for your kids to improve these skills. Cutting out Santa shapes from colored cardstock, picking up pieces, and gluing them onto the plate all require precision and dexterity. Provide the children with templates that challenge them to:
- Trace and cut patterns with scissors.
- Glue small cotton balls for Santa’s beard, requiring careful pinch and place finger movements.
Educational Crafting: Using Santa Templates and Patterns
Santa templates and patterns do more than just entertain; they serve as educational tools that teach kids about symmetry, shapes, and patterns. Engage the children with:
- Pattern block mats shaped as Santa, guiding them to match colored shapes within the template.
- Do a dot printables, which combine color recognition and patterning, with kids using pencils or markers to fill in pre-designed Santa-themed dots.
Engaging in these Santa craft activities provides a creative avenue for learning and developing essential skills.
Alternative Christmas Craft Ideas for Kids

When seeking festive and creative activities for your little ones, consider these engaging Christmas crafts for kids:
1. Handprint Wreaths:
Trace your child’s hand onto green construction paper and cut out multiple copies. Arrange the handprints in a circle to form a wreath, gluing the ends together. Decorate with red pom-poms or stickers as holly berries.
2. Popsicle Stick Snowflakes:
Collect popsicle sticks and glue them together to form snowflake shapes. Paint them white, silver, or blue, and add glitter for a sparkling effect. Hang these from the ceiling or on the tree with string.
Materials Needed:
- Green construction paper
- Red pom-poms
- Popsicle sticks
- String
- Glitter
3. Salt Dough Ornaments:
Mix salt dough using 2 cups flour, 1 cup salt, and 1 cup water. Roll out the dough and use cookie cutters to create Christmas shapes. Poke a hole at the top before baking for stringing and decorate after cooling.
4. Yarn-Wrapped Christmas Trees:
Cut cardboard into triangle shapes. Wrap different colors of yarn around the triangles for a textured tree. Embellish with bead ornaments or button stars.
Make sure to supervise crafting sessions and assist with any difficult steps. Crafting with your children not only leads to festive decorations but also provides a joyful opportunity for family bonding during the Christmas season.
Frequently Asked Questions

Creating a festive Santa Claus craft with paper plates is a fun holiday activity. The questions below will guide you through the entire crafting process, ensuring a merry and easy crafting experience.
What materials do I need to create a Santa Claus craft using paper plates?
To make a Santa Claus craft, you’ll need paper plates, red and white craft paper, cotton balls, glue, scissors, markers or paint, and any additional decorations you’d like to add for personal flair.
Can you provide step-by-step instructions for making a paper plate Santa Claus for kindergarteners?
Absolutely. Start with a white paper plate as the base. Cut a hat shape from red paper and glue it to the top. Use markers to draw eyes and a nose. Finally, glue cotton balls around the edge of the plate for the beard and hat’s trim. Keep the steps simple for kindergarteners to follow.
How can I incorporate cotton balls into a Santa Claus paper plate craft to represent his beard?
Glue cotton balls around the lower edge of the paper plate for a fluffy beard. Add more layers as desired for extra fullness. You can also pull the cotton balls apart slightly for an even more textured look.
What are some creative ways to make a Santa Claus face using paper plates and common household items?
For the face, use a flesh-tone paint or paper. Mustache and eyebrows can be drawn or cut from construction paper. Use buttons or beads for the eyes, and a red pom-pom or paper circle for the nose. Glasses can be made from pipe cleaners or paper.
How can I adapt a paper plate Santa Claus craft to be suitable for four-year-old children?
Choose non-toxic glue and safety scissors for this age group. Pre-cut shapes can make the assembly easier for small hands, and using more significant decorations, like large buttons for eyes, will help in their ability to handle and place these elements.
Aside from Santa Claus, what other Christmas-themed crafts can I make with paper plates for children?
Other craft ideas include paper plate wreaths, reindeer, angels, or Christmas trees. Simply use different colors and decorations like tissue paper, glitter, stickers, and yarn to create these festive items.

